Creating URL Shortener using NodeJs, Express, and MongoDB
In this post we will show you Creating URL Shortener using NodeJs, Express, and MongoDB, hear for Creating URL Shortener using NodeJs, Express, and MongoDB we will give you demo and example for implement.hear we will give you code for Creating URL Shortener using NodeJs and execution for it.
In this tutorial we will be creating a URL shortening service similar to sites like bitly.com using NodeJS, Express, and MongoDB. Express will be used to handle our routing and redirection while MongoDB takes care of storing and looking up the shortened links. Have a look at the demo to understand what we will building throughout this tutorial.
At a high level the URL shortener works by taking a long URL and applying a hashing algorithm to spit out a shorter version of the URL and stores them in a database for later lookup.
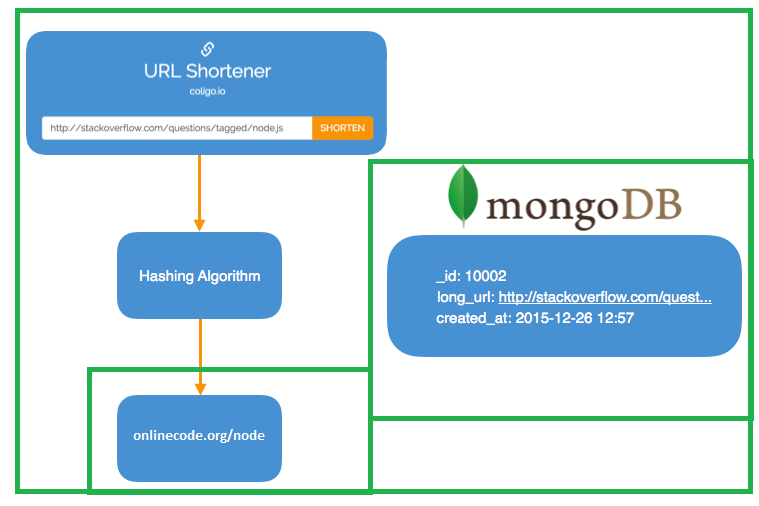
Once someone visits the short version of the URL, our server will query the database for that hash key to retrieve the original, longer URL and redirect them to it.

You can get the full, working code for the URL shortener on GitHub or fire up your favorite editor and follow along!
Installing MongoDB FOR Creating URL Shortener using NodeJs
for Shortener using NodeJs, Express, and MongoDB we need to Installing MongoDB, so Let’s start off by installing MongoDB locally, which is a NoSQL database that will store our links and their hashes.
Although any type of database would work perfectly fine, whether it is a relational one like MySQL or a non-relational one like Mongo, we will go with the non-relational alternative as there plenty of tutorials already out there on building URL shorteners using relational databases.
The MongoDB website has excellent instructions on installing the database on all 3 platforms: OS X, Windows, and Linux
The process is surprisingly simple and takes just a couple of minutes. For the purpose of this tutorial I will go over installing MongoDB on OS X using Homebrew.
Type the following commands in your terminal to update your packages and install mongodb:
brew update
brew install mongodb
If you wish to install it on your Mac without Homebrew you can check out the manual instructions here.
Once the installation completes successfully, we will need to create the directory to which the mongod process will write data. The default directory that mongod uses is /data/db, so lets go ahead and create that:
mkdir -p /data/db
We can now start up our MongoDB database by typing:
mongod
Note: if you run into any ‘permission denied’ errors, make sure that the user account running mongod has read and write permissions to the /data/db directory.
Once you execute the mongod command you should see a similar output:

Creating the NodeJS + Express Project
For Shortener using NodeJs, Express, and MongoDB and Now that we have our MongoDB instance up and running, let’s create the project structure for our Node + Express application.
Start off by creating a new empty directory and cd-ing into it, we’ll call this directory url-shortener:
mkdir url-shortener
cd url-shortener
Let’s initialize a package.json file to keep track of our dependencies installed via NPM as well as some basic project metadata:
npm init
You will be prompted with a couple of questions which you could answer however you wish, hit enter to accept the defaults shown in the parentheses:
name: (url-shortener)
version: (1.0.0)
description: A NodeJS, Express, and MongoDB URL Shortening Service
entry point: (index.js) app.js
test command:
git repository:
keywords:
author: Fady Makram
license: (ISC) MIT
Once you confirm your inputs, a package.json file will be created in the url-shortener directory with app.js being our entry point.
Install Express by typing npm install express –save. The –save flag will add express to your package.json dependencies.
Using your favorite text editor, create the main entry point for our Node application app.js as well as the folder structure.
Our app.js file will have 3 routes which Express will handle:
// require and instantiate express
var express = require('express');
var app = express();

app.get('/', function(req, res){
// route to serve up the homepage (index.html)
});

app.post('/api/shorten', function(req, res){
// route to create and return a shortened URL given a long URL
});

app.get('/:encoded_id', function(req, res){
// route to redirect the visitor to their original URL given the short URL
});

var server = app.listen(3000, function(){
console.log('Server listening on port 3000');
});
Creating the Front End
If you haven’t already checked out the demo, the front end we’ll be creating is going to be quite simple:
It uses some simple Bootstrap and CSS for basic styling to give our page some life. For the purpose of this tutorial we won’t go through the process of recreating the front end as it’s mostly just a basic HTML form to submit the URL for shortening.
We can save this HTML file in our views folder as index.html:
<!DOCTYPE html>
<html>
<head>
<meta charset="utf-8">
<meta http-equiv="X-UA-Compatible" content="IE=edge">
<meta name="viewport" content="width=device-width, initial-scale=1">

<title>URL Shortener - onlinecode</title>
<link href='https://fonts.googleapis.com/css?family=Raleway' rel='stylesheet' type='text/css'>
<link rel="stylesheet" href="https://maxcdn.bootstrapcdn.com/bootstrap/3.3.6/css/bootstrap.min.css">
<link href="css/styles.css" rel="stylesheet">
</head>
<body>

<div class="site-wrapper">
<div class="site-wrapper-inner">
<div class="main-container">
<div class="inner cover">
<span class="glyphicon glyphicon-link"></span>
<h1>URL Shortener</h1>
<h4>onlinecode</h4>

<div class="row">

<div class="col-lg-12">
<div class="input-group input-group-lg">
<input id="url-field" type="text" class="form-control" placeholder="Paste a link...">
<span class="input-group-btn">
<button class="btn btn-shorten" type="button">SHORTEN</button>
</span>
</div>
</div>

<div class="col-lg-12">
<div id="link"></div>
</div>

</div>

</div>
</div>
</div>
</div>

<script src="https://code.jquery.com/jquery-2.1.4.min.js"></script>
<script src="https://maxcdn.bootstrapcdn.com/bootstrap/3.3.6/js/bootstrap.min.js"></script>
<script src="javascripts/shorten.js"></script>
</body>
</html>
Let’s do the same with the CSS file. Create a file called styles.css in the public/css directory:
.btn:focus, .btn-shorten:focus{
outline: 0 !important;
}

html,
body {
height: 100%;
background-color: #4791D2;
}

body {
color: #fff;
text-align: center;
font-family: 'Raleway', sans-serif;
}

.btn-shorten {
color: #ffffff;
background-color: #F89406;
border: none;
}

.btn-shorten:hover,
.btn-shorten:focus,
.btn-shorten:active,
.btn-shorten.active {
color: #ffffff;
background-color: #FA8900;
border: none;
}

.site-wrapper {
display: table;
width: 100%;
height: 100%;
min-height: 100%;
}

.site-wrapper-inner {
display: table-cell;
vertical-align: top;
}

.main-container {
margin-right: auto;
margin-left: auto;
margin-top: 80px;
}

.inner {
padding: 30px;
}

.inner h4 {
padding-bottom: 30px;
}

.glyphicon-link {
font-size: 2em;
}

.inner h1 {
margin-top: 5px;
}

#link {
display: none;
padding-top: 15px;
}

#link a{
color: #F89406;
font-size: 1.5em;
margin-right: 20px;
}

@media (min-width: 768px) {
.main-container {
width: 100%;
}
}

@media (min-width: 992px) {
.main-container {
width: 700px;
}
}
Now that we have the basic HTML structure and the styling for our front end in the right folders, let’s serve the files using the Express routes we saw earlier in our app.js file:
// require and instantiate express
var express = require('express');
var app = express();
// we'll need the path module to correctly concatenate our paths
var path = require('path');

// tell Express to serve files from our public folder
app.use(express.static(path.join(__dirname, 'public')));

app.get('/', function(req, res){
// route to serve up the homepage (index.html)
res.sendFile(path.join(__dirname, 'views/index.html'));
});

var server = app.listen(3000, function(){
console.log('Server listening on port 3000');
});
Saving the file, typing node app.js to start the server and going to http://localhost:3000, you should see the basic homepage for our URL Shortener.
Developing a Shortening Algorithm
This is the interesting part where the actual URL shortening happens.
Before we dive into the implementation, let’s explore the basic theory behind URL shortening. Our requirement is:
given a long URL such as “http://stackoverflow.com/questions/tagged/node.js”, generate a unique URL that is shorter such as “onlinecode/3Ys”.
First let’s look at actually generating a unique key from our original URL, in this case 3Ys, which is at the end of our onlinecode URL.
To satisfy the uniqueness requirement, we can leverage a special class of functions called bijective functions, which guarantee a 1-to-1 mapping. For our purposes a bijective function basically says:
A long URL is mapped to exactly one key, and a key is mapped to exactly one long URL
We will be using base encoding/decoding as our bijective function, specifically base58. We will be converting a unique integer ID (which is in base10) to it’s equivalent in base58. The base58 alphabet we will be using is:
ABCDEFGHJKLMNPQRSTUVWXYZabcdefghijkmnopqrstuvwxyz123456789
It is just the numbers 1-9, a-z, and A-Z, giving us a total of 58 characters, hence the 58 in base58. We are excluding 0, l, O to avoid confusion when sharing the URL over the phone or copying it manually.
If you’re not familiar with bases you can check out this tutorial.
Now to put it all together to generate a shorter URL, our solution will be as follows:
Create a global auto incremented integer
Every time a new URL is shortened and added to our database, we’ll increment that global number (base 10) and use it as our unique ID for that entry in the DB
Base58 encode that unique ID to generate a unique, shorter URL
For example: An entry with the unique ID 10002 (base 10) will result in a base58 encoding of 3Ys. So if you store a lot of URLs, say 100,000,000, that would generate a shortened hash: 9QwvW
Now that we have the theory out of the way and our solution mocked up, we can create a node module for our base encoding and decoding. Let’s call this file base58.js and save it in our url-shortener directory.
Our alphabet as mentioned earlier (1-9, a-z, A-Z, excluding 0, l, O):
var alphabet = “123456789abcdefghijkmnopqrstuvwxyzABCDEFGHJKLMNPQRSTUVWXYZ”;
var base = alphabet.length; // base is the length of the alphabet (58 in this case)
In fact, feel free to define your own alphabet and base since the code we’re going to use for encoding and decoding are generic enough to handle any base.
The generic encode function that we’ll be using to turn the unique database entry ID into a base58 string for a shorter and unique URL:
// utility function to convert base 10 integer to base 58 string
function encode(num){
var encoded = '';
while (num){
var remainder = num % base;
num = Math.floor(num / base);
encoded = alphabet[remainder].toString() + encoded;
}
return encoded;
}
The decode function to convert the base58 key at the end of a URL (onlinecode/3Ys) to it’s equivalent in base10 to retrieve the long URL from the MongoDB:
// utility function to convert a base 58 string to base 10 integer
function decode(str){
var decoded = 0;
while (str){
var index = alphabet.indexOf(str[0]);
var power = str.length - 1;
decoded += index * (Math.pow(base, power));
str = str.substring(1);
}
return decoded;
}
Expose the 2 functions for use in our app.js when handling the routes:
module.exports.encode = encode;
module.exports.decode = decode;
Creating the database and models
So far, we’ve installed MongoDB and created a simple front end which is served up using Express. We then went on to developed a shortening algorithm to shrink and expand our URLs.
Let’s actually put MongoDB to work by creating a database and 2 collections: one to store our URLs that we’re shortening and one to keep track of the global integer that acts as an ID for each entry in the URLs collection.
An example of our urls collection:
| _id | long_url | created_at |
|---|---|---|
| ……. | ……. | ……. |
| 100002 | http://www.onlinecode.org/node | 2017-07-26 11:27 |
| 100003 | https://docs.mongodb.org/getting-started/node/ | 2017-07-27 12:14 |
| 100004 | http://expressjs.com/en/starter/basic-routing.html | 2017-07-28 16:12 |
Our simple counters collection that keeps track of the last _id we inserted into our urls collection:
| _id | seq |
|---|---|
| url_count | 100004 |
Every time a user creates a short URL:
Our server will check the value of the url_count in our counters collection
Increment it by 1 and insert that new globally unique ID as the _id of the new entry in the urls collection
If you’re more familiar with relational databases like MySQL, Postgres, SQLServer, etc.. you might be wondering why we need a separate collection to keep track of that global auto incremented ID. Unlike MySQL, for instance, which allows you to define a column as an auto incremented integer, MongoDB doesn’t support auto incremented fields. Instead, MongoDB has a unique field called _id that acts as a primary key, referred to as an ObjectID: a 12-byte BSON type.
We create a separate counters collection as opposed to just reading the last value of the urls collection to leverage the atomicity of the findAndModify method in MongoDB. This allows our application to handle concurrent URL shortening requests by atomically incrementing the seq field and returning the new value for use in our urls collection.
Let’s go ahead and start creating these collections and their respective models. We’ll start off by creating the counters collection via the mongo command line tool since we only need to insert a single item in it, the url_count.
If you don’t already have an instance of MongoDB running from our previous steps, go ahead and type mongod in your terminal to start it up.
In a separate terminal type mongo to connect to the running instance of MongoDB:
mongod and mongo commands
We can now use the terminal in which we ran the mongo command to run queries against our database. Let’s go ahead and create that database, we’ll call it url_shortener:
> use url_shortener
switched to db url_shortener
You can check what database you’re currently use-ing in your session by typing
> db
url_shortener
and you can list all your databases:
> show dbs
local  0.078GB
You won’t see the url_shortener database we just “created” because we need to insert at least one document in it first. So let’s go ahead and create the counters collection with a counter called url_count starting at 0:
> db.counters.insert({ _id: 'url_count', seq: 1 })
WriteResult({ "nInserted" : 1 })
That’s it! Let’s go back into our NodeJS code and create the schema and models to be able to use these collections via our application for insertions and lookups. NodeJS has a great package for connecting to a MongoDB called mongoose which is a very intuitive ODM (Object Data Modeling) library. We’ll install it via NPM to use in our project by typing:
npm install mongoose --save
We’ll create our URL model in our models directory within the url-shortener project, called url.js. Start off with our requires to grab mongoose:
var mongoose = require('mongoose');
var Schema = mongoose.Schema;
Next we need to define a schema for our collection and using that schema, we create our model. The counters collection is rather straightforward:

// create the counters schema with an _id field and a seq field
var CounterSchema = Schema({
_id: {type: String, required: true},
seq: { type: Number, default: 0 }
});

// create a model from that schema
var counter = mongoose.model('counter', CounterSchema);
We'll do the same thing for our urls collection by defining it's schema as we did for the counters collection:

// create a schema for our links
var urlSchema = new Schema({
_id: {type: Number, index: true},
long_url: String,
created_at: Date
});
Now this is the crucial part where we use the findAndModify function we talked about earlier. What we’re trying to achieve is the following:
Before saving an entry in the urls collection, increment the global url_count in the counters collection and use that as the _id field of the urls collection
Putting that into code:
// The pre('save', callback) middleware executes the callback function
// every time before an entry is saved to the urls collection.
urlSchema.pre('save', function(next){
var doc = this;
// find the url_count and increment it by 1
counter.findByIdAndUpdate({_id: 'url_count'}, {$inc: {seq: 1} }, function(error, counter) {
if (error)
return next(error);
// set the _id of the urls collection to the incremented value of the counter
doc._id = counter.seq;
doc.created_at = new Date();
next();
});
});
We have the pre-save functionality in place to automatically increment the counter and assign it as the unique identifier of the url entry which we will be encoding and decoding for shortening. Let’s create the model from the URL schema:
var Url = mongoose.model('Url', urlSchema);
and finally export the Url model for use in our app.js:
module.exports = Url;
Saving the shortened URLs
In this section we’ll be:
- Taking long URLs submitted by the user via the front end
- Storing it in the database using the models we created in the previous section
- Encoding the _id of the newly inserted object
- Returning the shortened version of the URL to the user
With that being said, let’s add the front end javascript that will take what the user entered in the form and POST it to our /api/shorten route. Create a new file in the public/javascripts directory in your project and call it shorten.js since that’s what we used in the HTML file:
// add an event listener to the shorten button for when the user clicks it
$('.btn-shorten').on('click', function(){
// AJAX call to /api/shorten with the URL that the user entered in the input box
$.ajax({
url: '/api/shorten',
type: 'POST',
dataType: 'JSON',
data: {url: $('#url-field').val()},
success: function(data){
// display the shortened URL to the user that is returned by the server
var resultHTML = '<a class="result" href="' + data.shortUrl + '">'
+ data.shortUrl + '</a>';
$('#link').html(resultHTML);
$('#link').hide().fadeIn('slow');
}
});

});
We now have to add the server side logic in our app.js file that will take that data (the long url) from the AJAX call when the user submits the form and return the shortened URL. To get the data submitted in the body of the POST request, we will use a middleware called body-parser, we can install it via NPM:
npm install body-parser --save
and we’ll require and configure our application to use this middleware:
var bodyParser = require('body-parser');

// handles JSON bodies
app.use(bodyParser.json());
// handles URL encoded bodies
app.use(bodyParser.urlencoded({ extended: true }));
The incoming POST requests can now be parsed and handled by that middleware for our routes.
Let’s go ahead and create a config file to store our connection information and URL shortener host so we can use it throughout our application without having to hard code it and change it in many different places. We’ll call this file config.js and save it in the root of our url-shortener project folder:
var config = {};

config.db = {};
// the URL shortening host - shortened URLs will be this + base58 ID
// i.e.: http://localhost:3000/3Ys
config.webhost = 'http://localhost:3000/';

// your MongoDB host and database name
config.db.host = 'localhost';
config.db.name = 'url_shortener';

module.exports = config;
Grab the remaining imports that we'll use in our app.js:

var mongoose = require('mongoose');
var config = require('./config');
// base58 for encoding and decoding functions
var base58 = require('./base58.js');

// grab the url model
var Url = require('./models/url');
We now have all the tools, modules and configurations in place and our app.js should look something like this:

var express = require('express');
var app = express();
var path = require('path');
var bodyParser = require('body-parser');
var mongoose = require('mongoose');
var config = require('./config');
var base58 = require('./base58.js');

// grab the url model
var Url = require('./models/url');

// create a connection to our MongoDB
mongoose.connect('mongodb://' + config.db.host + '/' + config.db.name);

app.use(bodyParser.json());
app.use(bodyParser.urlencoded({ extended: true }));

// tell Express to serve file from our public folder
app.use(express.static(path.join(__dirname, 'public')));

app.get('/', function(req, res){
// route to serve up the homepage (index.html)
res.sendFile(path.join(__dirname, 'views/index.html'));
});

var server = app.listen(3000, function(){
console.log('Server listening on port 3000');
});
The route that will handle the incoming POST request:
app.post('/api/shorten', function(req, res){

});
What we want to do in this route once we receive a shortening request is:
Check if the URL has already been shortened to avoid creating duplicates:
If it has been shortened, return the base58 encoded ID right away
If it hasn’t been shortened, we will create a new entry for it
Let’s grab the long URL submitted by the user from our POST body:
app.post('/api/shorten', function(req, res){
var longUrl = req.body.url;
var shortUrl = ''; // the shortened URL we will return
});
To check if a URL has already been shortened, we can use the findOne method to search for the long URL in our database. This function will return a single entry if there is a match:
app.post('/api/shorten', function(req, res){
var longUrl = req.body.url;
var shortUrl = '';

// check if url already exists in database
Url.findOne({long_url: longUrl}, function (err, doc){
if (doc){
// URL has already been shortened
} else {
// The long URL was not found in the long_url field in our urls
// collection, so we need to create a new entry
}
});

});
In the case that the URL has already been shortened, we will use the doc parameter passed in the callback of the findOne method to grab the _id of that entry in the urls collection and base58 encode it:
app.post('/api/shorten', function(req, res){
var longUrl = req.body.url;
var shortUrl = '';

// check if url already exists in database
Url.findOne({long_url: longUrl}, function (err, doc){
if (doc){
// base58 encode the unique _id of that document and construct the short URL
shortUrl = config.webhost + base58.encode(doc._id);

// since the document exists, we return it without creating a new entry
res.send({'shortUrl': shortUrl});
} else {
// The long URL was not found in the long_url field in our urls
// collection, so we need to create a new entry
}

});

});
When the long URL is not found, we will have to create a new Url object and use the save method to save it to our urls collection. Incrementing the counters collection and assigning it to the _id of the urls_collection is already taken care of for us in the pre save middleware within url.js model we defined.
app.post('/api/shorten', function(req, res){
var longUrl = req.body.url;
var shortUrl = '';

// check if url already exists in database
Url.findOne({long_url: longUrl}, function (err, doc){
if (doc){
// base58 encode the unique _id of that document and construct the short URL
shortUrl = config.webhost + base58.encode(doc._id);

// since the document exists, we return it without creating a new entry
res.send({'shortUrl': shortUrl});
} else {
// The long URL was not found in the long_url field in our urls
// collection, so we need to create a new entry:
var newUrl = Url({
long_url: longUrl
});

// save the new link
newUrl.save(function(err) {
if (err){
console.log(err);
}

// construct the short URL
shortUrl = config.webhost + base58.encode(newUrl._id);

res.send({'shortUrl': shortUrl});
});
}

});

});
And that’s it! We now have the URL saving functionality in our application and all that’s left is to redirect the visitor when they visit a shortened URL, so on to the final section.
Redirecting the visitor
When someone visits a URL shortened by our service such as onlinecode/3Ys, we want to:
Take the 3Ys from the URL
Decode it to get the unique _id of our document in the urls collection
Redirect them to the associated long_url in that document
Thankfully Express makes dynamic URL parameters really easy:
app.get('/:encoded_id', function(req, res){

});
Express will take the base58 encoded ID at the end of our URL and assign it to a variable called encoded_id for us to use in our callback. For example, if a user visits onlinecode/3Ys, the variable encoded_id will hold the value 3Ys.
We will decode the base58 ID to get it’s base10 equivalent and look it up in the database using the findOne method. If we manage to find that _id in the database, we will then redirect the visitor to their actual destination with Express’s res.redirect method with a 301 redirect status. However, if we don’t find anything in the database with that _id we can simply redirect them to the homepages (or potentially a 404 page).
app.get('/:encoded_id', function(req, res){
var base58Id = req.params.encoded_id;
var id = base58.decode(base58Id);

// check if url already exists in database
Url.findOne({_id: id}, function (err, doc){
if (doc) {
// found an entry in the DB, redirect the user to their destination
res.redirect(doc.long_url);
} else {
// nothing found, take 'em home
res.redirect(config.webhost);
}
});

});
Conclusion For Creating URL Shortener using NodeJs, Express, and MongoDB
In this tutorial we covered the underlying logic and concepts of how a URL shortening service works and Creating URL Shortener using NodeJs, Express, and MongoDB. There are plenty of other ways you can go about Creating URL Shortener and perhaps even more efficient ways of doing it such as swapping out MongoDB for redis.
The purpose of this tutorial is to get you started and familiar with the concepts of a URL shortener, so I’d encourage you to take what you learned a step further and implement more optimal solutions and try out different stacks and algorithms. I’d love to hear about your ideas and how you chose to implement a URL shortener, so leave a comment below!
Feel free to download the full code for this tutorial to see the full picture of how everything works together and customize it for your own needs.
Hope this code and post will helped you for implement Creating URL Shortener using NodeJs, Express, and MongoDB. if you need any help or any feedback give it in comment section or you have good idea about this post you can give it comment section. Your comment will help us for help you more and improve onlincode. we will give you this type of more interesting post in featured also so, For more interesting post and code Keep reading our blogs onlincode.org